Intro / Quick start


EMHASS

Energy Management for Home Assistant


GitHub release (latest by date) GitHub Workflow Status GitHub PyPI - Python Version PyPI - Status Read the Docs


If you like this work please consider buying a coffee ;-)

Buy Me A Coffee

EHMASS is a Python module designed to optimize your home energy interfacing with Home Assistant.

Introduction

EMHASS (Energy Management for Home Assistant) is an optimization tool designed for residential households. The package uses a Linear Programming approach to optimize energy usage while considering factors such as electricity prices, power generation from solar panels, and energy storage from batteries. EMHASS provides a high degree of configurability, making it easy to integrate with Home Assistant and other smart home systems. Whether you have solar panels, energy storage, or just a controllable load, EMHASS can provide an optimized daily schedule for your devices, allowing you to save money and minimize your environmental impact.

The complete documentation for this package is available here.

What is Energy Management for Home Assistant (EMHASS)?

EMHASS and Home Assistant provide a comprehensive energy management solution that can optimize energy usage and reduce costs for households. By integrating these two systems, households can take advantage of advanced energy management features that provide significant cost savings, increased energy efficiency, and greater sustainability.

EMHASS is a powerful energy management tool that generates an optimization plan based on variables such as solar power production, energy usage, and energy costs. The plan provides valuable insights into how energy can be better managed and utilized in the household. Even if households do not have all the necessary equipment, such as solar panels or batteries, EMHASS can still provide a minimal use case solution to optimize energy usage for controllable/deferrable loads.

Home Assistant provides a platform for the automation of household devices based on the optimization plan generated by EMHASS. This includes devices such as batteries, pool pumps, hot water heaters, and electric vehicle (EV) chargers. By automating EV charging and other devices, households can take advantage of off-peak energy rates and optimize their EV charging schedule based on the optimization plan generated by EMHASS.

One of the main benefits of integrating EMHASS and Home Assistant is the ability to customize and tailor the energy management solution to the specific needs and preferences of each household. With EMHASS, households can define their energy management objectives and constraints, such as maximizing self-consumption or minimizing energy costs, and the system will generate an optimization plan accordingly. Home Assistant provides a platform for the automation of devices based on the optimization plan, allowing households to create a fully customized and optimized energy management solution.

Overall, the integration of EMHASS and Home Assistant offers a comprehensive energy management solution that provides significant cost savings, increased energy efficiency, and greater sustainability for households. By leveraging advanced energy management features and automation capabilities, households can achieve their energy management objectives while enjoying the benefits of a more efficient and sustainable energy usage, including optimized EV charging schedules.

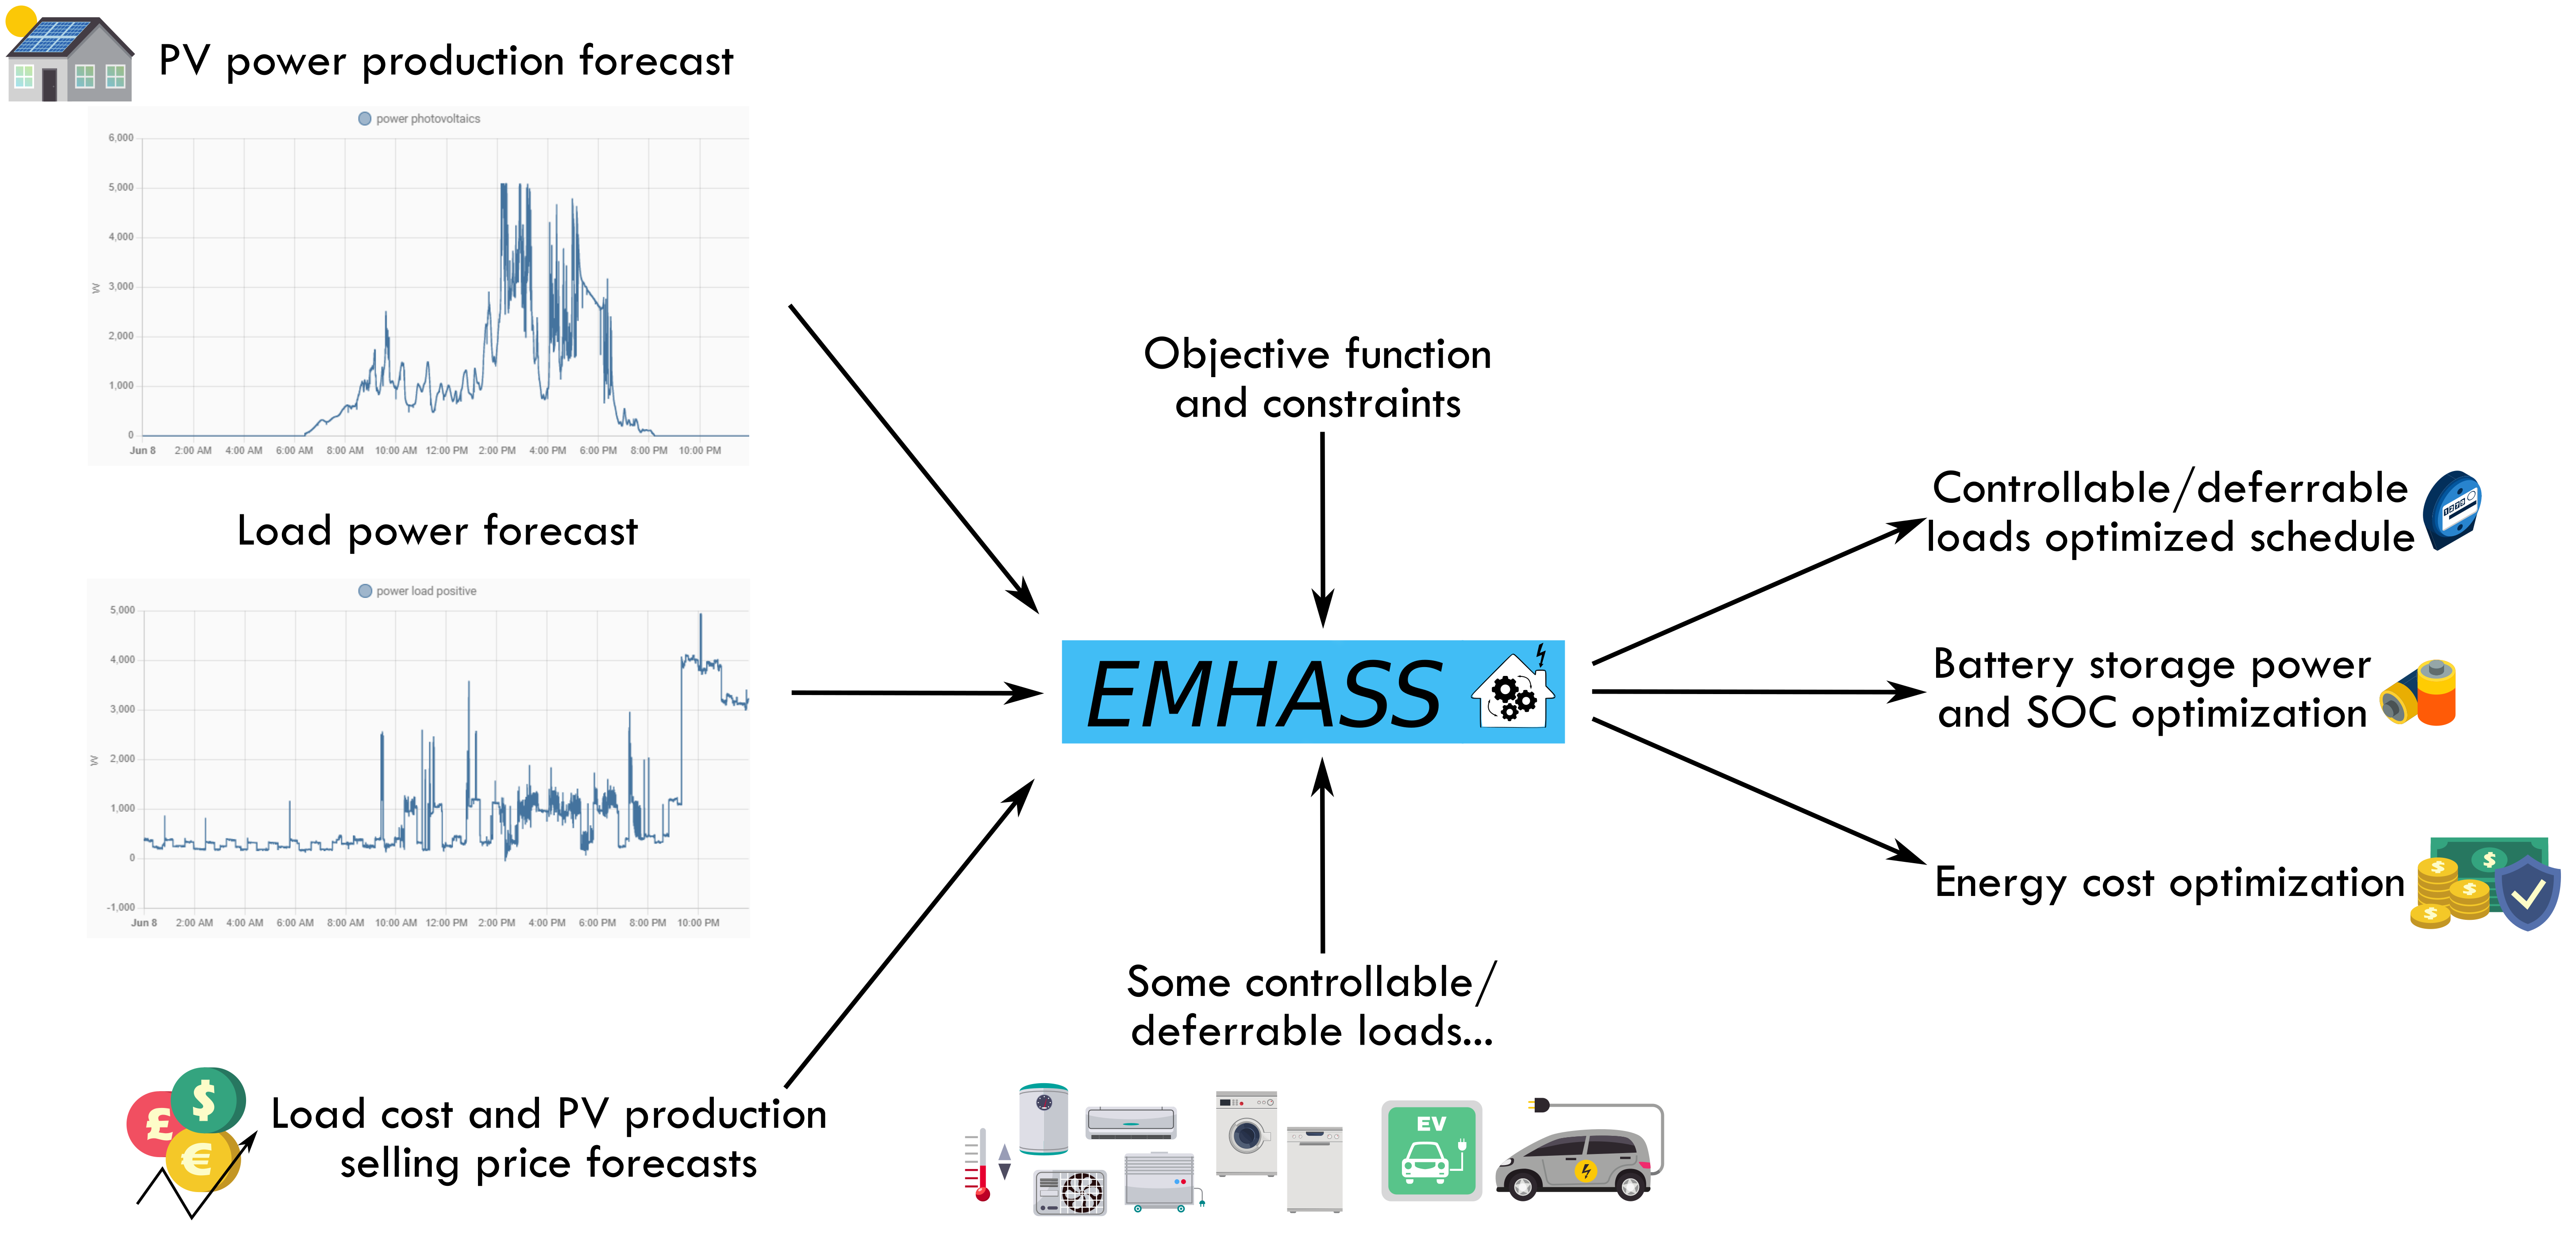
The package flow can be graphically represented as follows:

Configuration and Installation

The package is meant to be highly configurable with an object oriented modular approach and a main configuration file defined by the user. EMHASS was designed to be integrated with Home Assistant, hence it’s name. Installation instructions and example Home Assistant automation configurations are given below.

You must follow these steps to make EMHASS work properly:

  1. Define all the parameters in the configuration file according to your installation. See the description for each parameter in the configuration section.

  2. You most notably will need to define the main data entering EMHASS. This will be the sensor_power_photovoltaics for the name of the your hass variable containing the PV produced power and the variable sensor_power_load_no_var_loads for the load power of your household excluding the power of the deferrable loads that you want to optimize.

  3. Launch the actual optimization and check the results. This can be done manually using the buttons in the web ui or with a curl command like this: curl -i -H 'Content-Type:application/json' -X POST -d '{}' http://localhost:5000/action/dayahead-optim.

  4. If you’re satisfied with the optimization results then you can set the optimization and data publish task commands in an automation. You can read more about this on the usage section below.

  5. The final step is to link the deferrable loads variables to real switchs on your installation. An example code for this using automations and the shell command integration is presented below in the usage section.

A more detailed workflow is given below:

Method 1) The EMHASS add-on for Home Assistant OS and supervised users

For Home Assistant OS and HA Supervised users, I’ve developed an add-on that will help you use EMHASS. The add-on is more user friendly as the configuration can be modified directly in the add-on options pane and as with the standalone docker it exposes a web ui that can be used to inspect the optimization results and manually trigger a new optimization.

You can find the add-on with the installation instructions here: https://github.com/davidusb-geek/emhass-add-on

The add-on usage instructions can be found on the documentation pane of the add-on once installed or directly here: EMHASS Add-on documentation

These architectures are supported: amd64, armv7, armhf and aarch64.

Method 2) Using Docker in standalone mode

You can also install EMHASS using docker. This can be in the same machine as Home Assistant (if using the supervised install method) or in a different distant machine. To install first pull the latest image from docker hub:

docker pull davidusb/emhass-docker-standalone

You can also build your image locally. For this clone this repository, setup your config_emhass.yaml file and use the provided make file with this command:

make -f deploy_docker.mk clean_deploy

Then load the image in the .tar file:

docker load -i <TarFileName>.tar

Finally check your image tag with docker images and launch the docker itself:

docker run -it --restart always -p 5000:5000 -e LOCAL_COSTFUN="profit" -v $(pwd)/config_emhass.yaml:/app/config_emhass.yaml -v $(pwd)/secrets_emhass.yaml:/app/secrets_emhass.yaml --name DockerEMHASS <REPOSITORY:TAG>
  • If you wish to keep a local, persistent copy of the EMHASS generated data, create a local folder on your device, then mount said folder inside the container.

    mkdir -p $(pwd)/data #linux: create data folder on local device
    
    docker run -it --restart always -p 5000:5000 -e LOCAL_COSTFUN="profit" -v $(pwd)/config_emhass.yaml:/app/config_emhass.yaml -v $(pwd)/data:/app/data  -v $(pwd)/secrets_emhass.yaml:/app/secrets_emhass.yaml --name DockerEMHASS <REPOSITORY:TAG>
    

If you wish to set the web_server’s diagrams to a timezone other than UTC, set TZ environment variable on:

docker run -it --restart always -p 5000:5000  -e TZ="Europe/Paris"  -e LOCAL_COSTFUN="profit" -v $(pwd)/config_emhass.yaml:/app/config_emhass.yaml -v $(pwd)/secrets_emhass.yaml:/app/secrets_emhass.yaml --name DockerEMHASS <REPOSITORY:TAG>

Method 3) Legacy method using a Python virtual environment

With this method it is recommended to install on a virtual environment. For this you will need virtualenv, install it using:

sudo apt install python3-virtualenv

Then create and activate the virtual environment:

virtualenv -p /usr/bin/python3 emhassenv
cd emhassenv
source bin/activate

Install using the distribution files:

python3 -m pip install emhass

Clone this repository to obtain the example configuration files. We will suppose that this repository is cloned to:

/home/user/emhass

This will be the root path containing the yaml configuration files (config_emhass.yaml and secrets_emhass.yaml) and the different needed folders (a data folder to store the optimizations results and a scripts folder containing the bash scripts described further below).

To upgrade the installation in the future just use:

python3 -m pip install --upgrade emhass

Usage

Method 1) Add-on and docker standalone

If using the add-on or the standalone docker installation, it exposes a simple webserver on port 5000. You can access it directly using your brower, ex: http://localhost:5000.

With this web server you can perform RESTful POST commands on multiple ENDPOINTS with prefix action/*:

  • A POST call to action/perfect-optim to perform a perfect optimization task on the historical data.

  • A POST call to action/dayahead-optim to perform a day-ahead optimization task of your home energy.

  • A POST call to action/naive-mpc-optim to perform a naive Model Predictive Controller optimization task. If using this option you will need to define the correct runtimeparams (see further below).

  • A POST call to action/publish-data to publish the optimization results data for the current timestamp.

  • A POST call to action/forecast-model-fit to train a machine learning forecaster model with the passed data (see the dedicated section for more help).

  • A POST call to action/forecast-model-predict to obtain a forecast from a pre-trained machine learning forecaster model (see the dedicated section for more help).

  • A POST call to action/forecast-model-tune to optimize the machine learning forecaster models hyperparameters using bayesian optimization (see the dedicated section for more help).

A curl command can then be used to launch an optimization task like this: curl -i -H 'Content-Type:application/json' -X POST -d '{}' http://localhost:5000/action/dayahead-optim.

Method 2) Legacy method using a Python virtual environment

To run a command simply use the emhass CLI command followed by the needed arguments. The available arguments are:

  • --action: That is used to set the desired action, options are: perfect-optim, dayahead-optim, naive-mpc-optim, publish-data, forecast-model-fit, forecast-model-predict and forecast-model-tune.

  • --config: Define path to the config.yaml file (including the yaml file itself)

  • --costfun: Define the type of cost function, this is optional and the options are: profit (default), cost, self-consumption

  • --log2file: Define if we should log to a file or not, this is optional and the options are: True or False (default)

  • --params: Configuration as JSON.

  • --runtimeparams: Data passed at runtime. This can be used to pass your own forecast data to EMHASS.

  • --debug: Use True for testing purposes.

  • --version: Show the current version of EMHASS.

For example, the following line command can be used to perform a day-ahead optimization task:

emhass --action 'dayahead-optim' --config '/home/user/emhass/config_emhass.yaml' --costfun 'profit'

Before running any valuable command you need to modify the config_emhass.yaml and secrets_emhass.yaml files. These files should contain the information adapted to your own system. To do this take a look at the special section for this in the documentation.

Home Assistant integration

To integrate with home assistant we will need to define some shell commands in the configuration.yaml file and some basic automations in the automations.yaml file. In the next few paragraphs we are going to consider the dayahead-optim optimization strategy, which is also the first that was implemented, and we will also cover how to publish the results. Then additional optimization strategies were developed, that can be used in combination with/replace the dayahead-optim strategy, such as MPC, or to expland the funcitonalities such as the Machine Learning method to predict your hosehold consumption. Each of them has some specificities and features and will be considered in dedicated sections.

Dayahead Optimization - Method 1) Add-on and docker standalone

In configuration.yaml:

shell_command:
  dayahead_optim: "curl -i -H \"Content-Type:application/json\" -X POST -d '{}' http://localhost:5000/action/dayahead-optim"
  publish_data: "curl -i -H \"Content-Type:application/json\" -X POST -d '{}' http://localhost:5000/action/publish-data"

Dayahead Optimization - Method 2) Legacy method using a Python virtual environment

In configuration.yaml:

shell_command:
  dayahead_optim: /home/user/emhass/scripts/dayahead_optim.sh
  publish_data: /home/user/emhass/scripts/publish_data.sh

Create the file dayahead_optim.sh with the following content:

#!/bin/bash
. /home/user/emhassenv/bin/activate
emhass --action 'dayahead-optim' --config '/home/user/emhass/config_emhass.yaml'

And the file publish_data.sh with the following content:

#!/bin/bash
. /home/user/emhassenv/bin/activate
emhass --action 'publish-data' --config '/home/user/emhass/config_emhass.yaml'

Then specify user rights and make the files executables:

sudo chmod -R 755 /home/user/emhass/scripts/dayahead_optim.sh
sudo chmod -R 755 /home/user/emhass/scripts/publish_data.sh
sudo chmod +x /home/user/emhass/scripts/dayahead_optim.sh
sudo chmod +x /home/user/emhass/scripts/publish_data.sh

Common for any installation method

In automations.yaml:

- alias: EMHASS day-ahead optimization
  trigger:
    platform: time
    at: '05:30:00'
  action:
  - service: shell_command.dayahead_optim
- alias: EMHASS publish data
  trigger:
  - minutes: /5
    platform: time_pattern
  action:
  - service: shell_command.publish_data

In these automations the day-ahead optimization is performed everyday at 5:30am and the data is published every 5 minutes.

The final action will be to link a sensor value in Home Assistant to control the switch of a desired controllable load. For example imagine that I want to control my water heater and that the publish-data action is publishing the optimized value of a deferrable load that I want to be linked to my water heater desired behavior. In this case we could use an automation like this one below to control the desired real switch:

automation:
- alias: Water Heater Optimized ON
  trigger:
  - minutes: /5
    platform: time_pattern
  condition:
  - condition: numeric_state
    entity_id: sensor.p_deferrable0
    above: 0.1
  action:
    - service: homeassistant.turn_on
      entity_id: switch.water_heater_switch

A second automation should be used to turn off the switch:

automation:
- alias: Water Heater Optimized OFF
  trigger:
  - minutes: /5
    platform: time_pattern
  condition:
  - condition: numeric_state
    entity_id: sensor.p_deferrable0
    below: 0.1
  action:
    - service: homeassistant.turn_off
      entity_id: switch.water_heater_switch

The publish-data specificities

The publish-data command will push to Home Assistant the optimization results for each deferrable load defined in the configuration. For example if you have defined two deferrable loads, then the command will publish sensor.p_deferrable0 and sensor.p_deferrable1 to Home Assistant. When the dayahead-optim is launched, after the optimization, a csv file will be saved on disk. The publish-data command will load the latest csv file and look for the closest timestamp that match the current time using the datetime.now() method in Python. This means that if EMHASS is configured for 30min time step optimizations, the csv will be saved with timestamps 00:00, 00:30, 01:00, 01:30, … and so on. If the current time is 00:05, then the closest timestamp of the optimization results that will be published is 00:00. If the current time is 00:25, then the closest timestamp of the optimization results that will be published is 00:30.

The publish-data command will also publish PV and load forecast data on sensors p_pv_forecast and p_load_forecast. If using a battery, then the battery optimized power and the SOC will be published on sensors p_batt_forecast and soc_batt_forecast. On these sensors the future values are passed as nested attributes.

It is possible to provide custm sensor names for all the data exported by the publish-data command. For this, when using the publish-data endpoint just add some runtime parameters as dictionaries like this:

shell_command:
  publish_data: "curl -i -H \"Content-Type:application/json\" -X POST -d '{\"custom_load_forecast_id\": {\"entity_id\": \"sensor.p_load_forecast\", \"unit_of_measurement\": \"W\", \"friendly_name\": \"Load Power Forecast\"}}' http://localhost:5000/action/publish-data"

These keys are available to modify: custom_pv_forecast_id, custom_load_forecast_id, custom_batt_forecast_id, custom_batt_soc_forecast_id, custom_grid_forecast_id, custom_cost_fun_id, custom_deferrable_forecast_id, custom_unit_load_cost_id and custom_unit_prod_price_id.

If you provide the custom_deferrable_forecast_id then the passed data should be a list of dictionaries, like this:

shell_command:
  publish_data: "curl -i -H \"Content-Type:application/json\" -X POST -d '{\"custom_deferrable_forecast_id\": [{\"entity_id\": \"sensor.p_deferrable0\",\"unit_of_measurement\": \"W\", \"friendly_name\": \"Deferrable Load 0\"},{\"entity_id\": \"sensor.p_deferrable1\",\"unit_of_measurement\": \"W\", \"friendly_name\": \"Deferrable Load 1\"}]}' http://localhost:5000/action/publish-data"

And you should be careful that the list of dictionaries has the correct length, which is the number of defined deferrable loads.

Computed variables and published data

Below you can find a list of the variables resulting from EMHASS computation, shown in the charts and published to Home Assistant through the publish_data command:

EMHASS variable

Definition

Home Assistant published sensor

P_PV

Forecasted power generation from your solar panels (Watts). This helps you predict how much solar energy you will produce during the forecast period.

sensor.p_pv_forecast

P_Load

Forecasted household power consumption (Watts). This gives you an idea of how much energy your appliances are expected to use.

sensor.p_load_forecast

P_deferrableX
[X = 0, 1, 2, …]

Forecasted power consumption of deferrable loads (Watts). Deferable loads are appliances that can be managed by EMHASS. EMHASS helps you optimise energy usage by prioritising solar self-consumption and minimizing reliance on the grid or by taking advantage or supply and feed-in tariff volatility. You can have multiple deferable loads and you use this sensor in HA to control these loads via smart switch or other IoT means at your disposal.

sensor.p_deferrableX

P_grid_pos

Forecasted power imported from the grid (Watts). This indicates the amount of energy you are expected to draw from the grid when your solar production is insufficient to meet your needs or it is advantagous to consume from the grid.

-

P_grid_neg

Forecasted power exported to the grid (Watts). This indicates the amount of excess solar energy you are expected to send back to the grid during the forecast period.

-

P_batt

Forecasted (dis)charge power load (Watts) for the battery (if installed). If negative it indicates the battery is charging, if positive that the battery is discharging.

sensor.p_batt_forecast

P_grid

Forecasted net power flow between your home and the grid (Watts). This is calculated as P_grid_pos - P_grid_neg. A positive value indicates net export, while a negative value indicates net import.

sensor.p_grid_forecast

SOC_opt

Forecasted battery optimized Status Of Charge (SOC) percentage level

sensor.soc_batt_forecast

unit_load_cost

Forecasted cost per unit of energy you pay to the grid (typically “Currency”/kWh). This helps you understand the expected energy cost during the forecast period.

sensor.unit_load_cost

unit_prod_price

Forecasted price you receive for selling excess solar energy back to the grid (typically “Currency”/kWh). This helps you understand the potential income from your solar production.

sensor.unit_prod_price

cost_profit

Forecasted profit or loss from your energy usage for the forecast period. This is calculated as unit_load_cost * P_Load - unit_prod_price * P_grid_pos. A positive value indicates a profit, while a negative value indicates a loss.

sensor.total_cost_profit_value

cost_fun_cost

Forecasted cost associated with deferring loads to maximize solar self-consumption. This helps you evaluate the trade-off between managing the load and not managing and potential cost savings.

sensor.total_cost_fun_value

optim_status

This contains the status of the latest execution and is the same you can see in the Log following an optimization job. Its values can be Optimal or Infeasible.

sensor.optim_status

Passing your own data

In EMHASS we have basically 4 forecasts to deal with:

  • PV power production forecast (internally based on the weather forecast and the characteristics of your PV plant). This is given in Watts.

  • Load power forecast: how much power your house will demand on the next 24h. This is given in Watts.

  • Load cost forecast: the price of the energy from the grid on the next 24h. This is given in EUR/kWh.

  • PV production selling price forecast: at what price are you selling your excess PV production on the next 24h. This is given in EUR/kWh.

The sensor containing the load data should be specified in parameter var_load in the configuration file. As we want to optimize the household energies, when need to forecast the load power conumption. The default method for this is a naive approach using 1-day persistence. The load data variable should not contain the data from the deferrable loads themselves. For example, lets say that you set your deferrable load to be the washing machine. The variable that you should enter in EMHASS will be: var_load: 'sensor.power_load_no_var_loads' and sensor_power_load_no_var_loads = sensor_power_load - sensor_power_washing_machine. This is supposing that the overall load of your house is contained in variable: sensor_power_load. The sensor sensor_power_load_no_var_loads can be easily created with a new template sensor in Home Assistant.

If you are implementing a MPC controller, then you should also need to provide some data at the optimization runtime using the key runtimeparams.

The valid values to pass for both forecast data and MPC related data are explained below.

Forecast data

It is possible to provide EMHASS with your own forecast data. For this just add the data as list of values to a data dictionary during the call to emhass using the runtimeparams option.

For example if using the add-on or the standalone docker installation you can pass this data as list of values to the data dictionary during the curl POST:

curl -i -H 'Content-Type:application/json' -X POST -d '{"pv_power_forecast":[0, 0, 0, 0, 0, 0, 0, 0, 0, 0, 0, 0, 0, 0, 0, 0, 70, 141.22, 246.18, 513.5, 753.27, 1049.89, 1797.93, 1697.3, 3078.93, 1164.33, 1046.68, 1559.1, 2091.26, 1556.76, 1166.73, 1516.63, 1391.13, 1720.13, 820.75, 804.41, 251.63, 79.25, 0, 0, 0, 0, 0, 0, 0, 0, 0, 0]}' http://localhost:5000/action/dayahead-optim

Or if using the legacy method using a Python virtual environment:

emhass --action 'dayahead-optim' --config '/home/user/emhass/config_emhass.yaml' --runtimeparams '{"pv_power_forecast":[0, 0, 0, 0, 0, 0, 0, 0, 0, 0, 0, 0, 0, 0, 0, 0, 70, 141.22, 246.18, 513.5, 753.27, 1049.89, 1797.93, 1697.3, 3078.93, 1164.33, 1046.68, 1559.1, 2091.26, 1556.76, 1166.73, 1516.63, 1391.13, 1720.13, 820.75, 804.41, 251.63, 79.25, 0, 0, 0, 0, 0, 0, 0, 0, 0, 0]}'

The possible dictionary keys to pass data are:

  • pv_power_forecast for the PV power production forecast.

  • load_power_forecast for the Load power forecast.

  • load_cost_forecast for the Load cost forecast.

  • prod_price_forecast for the PV production selling price forecast.

Passing other data

It is possible to also pass other data during runtime in order to automate the energy management. For example, it could be useful to dynamically update the total number of hours for each deferrable load (def_total_hours) using for instance a correlation with the outdoor temperature (useful for water heater for example).

Here is the list of the other additional dictionary keys that can be passed at runtime:

  • num_def_loads for the number of deferrable loads to consider.

  • P_deferrable_nom for the nominal power for each deferrable load in Watts.

  • def_total_hours for the total number of hours that each deferrable load should operate.

  • def_start_timestep for the timestep as from which each deferrable load is allowed to operate (if you don’t want the deferrable load to use the whole optimization timewindow).

  • def_end_timestep for the timestep before which each deferrable load should operate (if you don’t want the deferrable load to use the whole optimization timewindow).

  • treat_def_as_semi_cont to define if we should treat each deferrable load as a semi-continuous variable.

  • set_def_constant to define if we should set each deferrable load as a constant fixed value variable with just one startup for each optimization task.

  • solcast_api_key for the SolCast API key if you want to use this service for PV power production forecast.

  • solcast_rooftop_id for the ID of your rooftop for the SolCast service implementation.

  • solar_forecast_kwp for the PV peak installed power in kW used for the solar.forecast API call.

  • SOCtarget for the desired target value of initial and final SOC.

  • publish_prefix use this key to pass a common prefix to all published data. This will add a prefix to the sensor name but also to the forecasts attributes keys within the sensor.

A naive Model Predictive Controller

A MPC controller was introduced in v0.3.0. This is an informal/naive representation of a MPC controller. This can be used in combination with/as a replacement of the Dayahead Optimization.

A MPC controller performs the following actions:

  • Set the prediction horizon and receding horizon parameters.

  • Perform an optimization on the prediction horizon.

  • Apply the first element of the obtained optimized control variables.

  • Repeat at a relatively high frequency, ex: 5 min.

This is the receding horizon principle.

When applying this controller, the following runtimeparams should be defined:

  • prediction_horizon for the MPC prediction horizon. Fix this at at least 5 times the optimization time step.

  • soc_init for the initial value of the battery SOC for the current iteration of the MPC.

  • soc_final for the final value of the battery SOC for the current iteration of the MPC.

  • def_total_hours for the list of deferrable loads functioning hours. These values can decrease as the day advances to take into account receding horizon daily energy objectives for each deferrable load.

  • def_start_timestep for the timestep as from which each deferrable load is allowed to operate (if you don’t want the deferrable load to use the whole optimization timewindow). If you specify a value of 0 (or negative), the deferrable load will be optimized as from the beginning of the complete prediction horizon window.

  • def_end_timestep for the timestep before which each deferrable load should operate (if you don’t want the deferrable load to use the whole optimization timewindow). If you specify a value of 0 (or negative), the deferrable load optimization window will extend up to the end of the prediction horizon window.

A correct call for a MPC optimization should look like:

curl -i -H 'Content-Type:application/json' -X POST -d '{"pv_power_forecast":[0, 70, 141.22, 246.18, 513.5, 753.27, 1049.89, 1797.93, 1697.3, 3078.93], "prediction_horizon":10, "soc_init":0.5,"soc_final":0.6}' http://192.168.3.159:5000/action/naive-mpc-optim

Example with :def_total_hours, def_start_timestep, def_end_timestep.

curl -i -H 'Content-Type:application/json' -X POST -d '{"pv_power_forecast":[0, 70, 141.22, 246.18, 513.5, 753.27, 1049.89, 1797.93, 1697.3, 3078.93], "prediction_horizon":10, "soc_init":0.5,"soc_final":0.6,"def_total_hours":[1,3],"def_start_timestep":[0,3],"def_end_timestep":[0,6]}' http://localhost:5000/action/naive-mpc-optim

A machine learning forecaster

Starting in v0.4.0 a new machine learning forecaster class was introduced. This is intended to provide a new and alternative method to forecast your household consumption and use it when such forecast is needed to optimize your energy through the available strategies. Check the dedicated section in the documentation here: https://emhass.readthedocs.io/en/latest/mlforecaster.html

Development

Pull request are very much accepted on this project. For development you can find some instructions here Development

Troubleshooting

Some problems may arise from solver related issues in the Pulp package. It was found that for arm64 architectures (ie. Raspberry Pi4, 64 bits) the default solver is not avaliable. A workaround is to use another solver. The glpk solver is an option.

This can be controlled in the configuration file with parameters lp_solver and lp_solver_path. The options for lp_solver are: ‘PULP_CBC_CMD’, ‘GLPK_CMD’ and ‘COIN_CMD’. If using ‘COIN_CMD’ as the solver you will need to provide the correct path to this solver in parameter lp_solver_path, ex: ‘/usr/bin/cbc’.

License

MIT License

Copyright (c) 2021-2023 David HERNANDEZ

Permission is hereby granted, free of charge, to any person obtaining a copy of this software and associated documentation files (the “Software”), to deal in the Software without restriction, including without limitation the rights to use, copy, modify, merge, publish, distribute, sublicense, and/or sell copies of the Software, and to permit persons to whom the Software is furnished to do so, subject to the following conditions:

The above copyright notice and this permission notice shall be included in all copies or substantial portions of the Software.

THE SOFTWARE IS PROVIDED “AS IS”, WITHOUT WARRANTY OF ANY KIND, EXPRESS OR IMPLIED, INCLUDING BUT NOT LIMITED TO THE WARRANTIES OF MERCHANTABILITY, FITNESS FOR A PARTICULAR PURPOSE AND NONINFRINGEMENT. IN NO EVENT SHALL THE AUTHORS OR COPYRIGHT HOLDERS BE LIABLE FOR ANY CLAIM, DAMAGES OR OTHER LIABILITY, WHETHER IN AN ACTION OF CONTRACT, TORT OR OTHERWISE, ARISING FROM, OUT OF OR IN CONNECTION WITH THE SOFTWARE OR THE USE OR OTHER DEALINGS IN THE SOFTWARE.